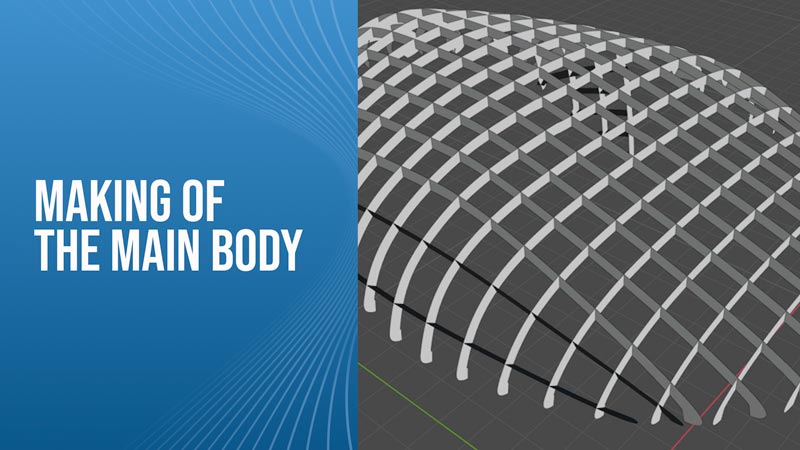
Before we can make our molds, we have to build the plug, which is what we call the positive mold. The plug is essentially the shape that we want the final product to be. So after the plug is built it is used to create the negative molds. The negative molds are what we use to create the final product. So we have to build the positive mold so that we can make the negative molds that will be used in the actual construction.
There are many different ways to build the plug but we have deided to use wooden ribs that are cut from thin sheets of wood. We have altered our 3D printer to act as a router so that we can cut these ribs out with more precision. Our software is able to optimize the material usage so that we can cut more pieces from each sheet of wood to cut down on waste.
After all of the pieces are cut out, they are laid out before being put together. Each rib section has several notches which interlock with the other sections to create the structure. Once all of the pieces are locked into each other, we have a grid-like structure that is roughly the final shape of that specific section of the SeaPod.
After we have the built grid structure, then we add plastic material to the top and bottom of the grids. Each grid square has a small hole that we use to fill the gaps with foam which gives the structure more support and rigidity. After the plastic material is applied, we will cover that with fiberglass and tooling gel coat so that we can finish the surface to be as smooth as we need it.
After we finish the surface then we basically have the final shape of the SeaPod. This is what we use to give the shape to the final molds that are used for production. Building the molds is a time-consuming task that requires a ton of effort from the entire team but it is something that needs to be perfect. This plug will be the shape for every SeaPod that comes from the molds that we make from it so it is an incredibly important step in our process.
